

1.Create a new text layer.
Create a new file in Photoshop with image size as 200 x 200.Choose foreground color as #b61ebf. Select the Rounded Rectangle Tool.Draw a rectangle with this tool. A new layer Shape 1 will be created.

3. Applying the borders for the button.

 This the output.
 5. Applying the gradient for the layer


Create a new file in Photoshop with image size as 200 x 200.Choose foreground color as #b61ebf. Select the Rounded Rectangle Tool.Draw a rectangle with this tool. A new layer Shape 1 will be created.
2.Create another layer.
Click on the layer Shape1 and press 'Ctrl + J' . A new layer Shape 1 Copy will be created. Click on the layer thumbnail of this new layer and change the color to #d176d7.
3. Applying the borders for the button.
Select the layer Shape 1 Copy .Choose the transform tool by clicking on 'Ctrl + T'. Using 'Shift + Alt' keys, reduce the size of this layer border .
4. Draw the design for the layer.
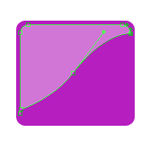
Select the layer Shape 1 Copy. Choose the 'Direct Selection Tool'.Delete the bottom right most 2 anchor points .To do this, select each anchor point and right click and choose 'delete anchor point'.The path of 'Direct Selection Tool' will change to a triangle.Move the bottom left most anchor points slightly to the top.
In the middle of the path,right click and choose 'Add Anchor Point'. Drag one of the anchor points to form the curve.
In the middle of the path,right click and choose 'Add Anchor Point'. Drag one of the anchor points to form the curve.
This the output.
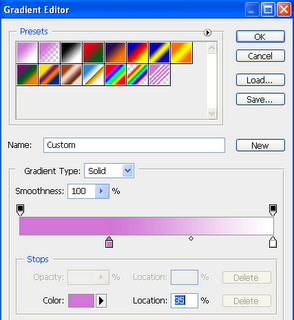
Choose the layer Shape 1 Copy. Select the option "Add a layer style". Choose the option 'Gradient Overlay'. Double click on "Gradient" option. Choose the upper left most colour "Foreground to Background". Change the color of the extreme left color stop by clicking on the color stop. Click the color option and choose the following color #d176d7.Drag the extreme color stop a bit to the right.

6. Add a custom shape to the layer.
Select the custom shape tool.Pick any shape you require.In our case we have selected this arrow shape. A new layer Shape2 will be created. Disable the effects of this layer once the shape is drawn.This is done to get a very clear shape.7. Add the text to the layer.
Select the Horizontal Type Tool. Select Myriad pro,Bold,18 point ,ffffff, Strong.A new layer
Layer 1 will be created. Type the text Download.

8. Add Bevel and Emboss
In case you need to add Bevel and Emboss effect ,select the Shape 1 Layer.Select the 'Add a Layer Style' button.Select Bevel and Emboss Option.Reduce the opacity to 15%.
In case you need to add Bevel and Emboss effect ,select the Shape 1 Layer.Select the 'Add a Layer Style' button.Select Bevel and Emboss Option.Reduce the opacity to 15%.
Labels: Photoshop
posted by Treesa @ 12:30 AM permanent link | |


Post a Comment