Twirl Effect ,
29 September, 2008
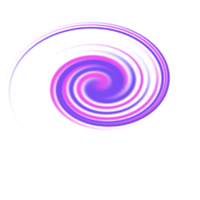
1.Create a new layer and use the brush tool.Create a new file in Photoshop.Choose foreground colour "#7e4af4" and "#ef66f1"
and with the help of brush tool,draw the following diagram.
Choose the following values for brush tool:
Master Pixels:60,Mode:Normal,Opacity:100%,Flow:100%
2.Applying the twirl effect.Choose Filter - > Distort -> Twirl .Choose angle as 999.We obtain the following twirl effect.
Labels: Photoshop
posted by Treesa
@ 5:58 AM
permanent link | |
Hedcut Drawing ,
16 September, 2008
A slight deviation from the regular photoshop tutorial...info on Headcut Drawing / Stipple Effect,which I found to be quite interesting.
This is a style of drawing ,mostly focussed on people,invented and used till today by the Wall Street Journal.The drawings are done with a standard size of 3" by 5.167" and the image is portrayed by means of a stipple method which consists of several dots to create the image.These are used to emulate the style of newspapers as well as those of engravings in certificates and currencies.
Its presumed that the spelling of "hed" might be based on newspapers' use of the term "hed" for "headline".A small history behind the invention of HedCut Drawing.It was first created by Kevin Sprouls,the freelance artist who first approached The Wall Street Journal with his ink dot drawings in 1979.Hedcut Drawing enriches the newspapers classical look and feel.
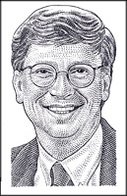
Need to checkout how to perform hedcut through photoshop.Here is a picture of Bill Gates done through Hed Cut Drawing.

Labels: Photoshop
posted by Treesa
@ 4:12 AM
permanent link | |
1. Background Layer:Create a new file in Photoshop with image size as 400 x 400.Choose foreground color as '66ccff'. Using Paint Bucket tool,paint the background.
2.Text Tool:Choose the text tool with font as Stencil Std,Bold,60 point,Sharp and color as '000099'.Type the following text.A new text layer Snow will be created.

3.Rasterize The Text:Rasterize the text by right clicking the layer 'Snow'.
4.Add new layer:Add new layer by clicking on 'Shift + Ctrl + N'.A new layer 'layer1' will be created.
5.Use Lasso tool to create selection:By choosing the Lasso Tool,select the areas where the snow effect has to be added.
 Click on Shift + F5 and choose white color to fill the selection with white color.

6.Add Blur:
Choose the option Filter->Blur->Gaussian Blur.Give the value as 2.5. This is the final effect.

Labels: Photoshop
posted by Treesa
@ 5:01 AM
permanent link | |
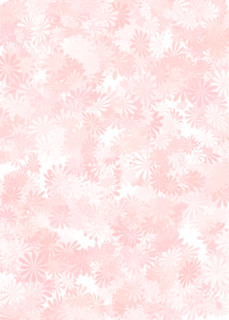
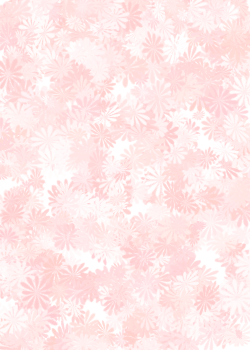
1. Create the background: Create a new file in Photoshop with image size as 250 x 350.
Choose foreground color #ffcccc. Select the brush tool .
Choose the brush pattern
Azalea with size as 40.Draw on the background to get the following output.
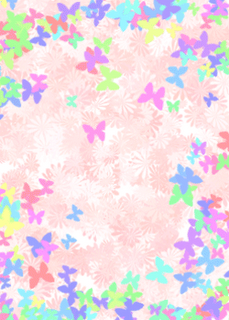
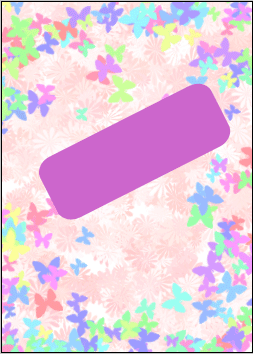
 2.Add additional effects:
 Choose the brush pattern
Butterfly or any other pattern as you prefer with size as 29.Draw on the background to get the following output.
3.Create the rectangle: Choose the Rounded Rectangle tool and by applying the following color #cc66cc,draw the rectangle.Choose the Transform tool by clicking on "Ctrl + T" and transform the rectangle as follows.
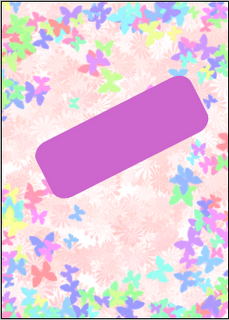 4.Text Tool:
Choose the Text tool and by applying the following color #333333,type the text "Best Wishes".Choose the Transform tool by clicking on "Ctrl + T" and transform the Text as follows.

Labels: Photoshop
posted by Treesa
@ 6:09 AM
permanent link | |


Post a Comment