Html5
CSS TUTORIAL FOR INTERMEDIATES: POSITIONING AND ITS TYPES.
Positioning HTML elements may be the toughest but most rewarding things you can master. There are four types to interpret the size styles:
- Position: static position is the default behavior if you do not set it – the element just appears where it is in the flow of the HTML
- Position: relative position allows you to set the position relative to the position it would have been in using static
- Position: absolute position allows you to set the position relative to its parent element (e.g. an image within a DIV)
- Position: fixed position allows you to set the position on the page ignoring any other elements
1) Static positioning in CSS:
This is the default if you do not specify the positioning for an element in the stylesheet.
If you have four paragraphs one after the other you most likely want them to appear one after the other on the page! The same applies to any other block element.
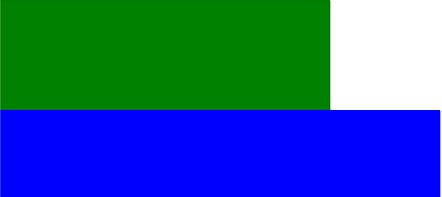
These blocks are positioned in the default way (position: static position):
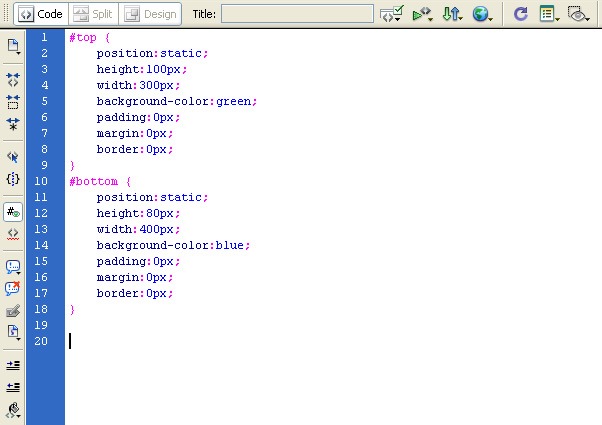
Below is the code in a stylesheet (embedded or external):
2) Relative positioning in CSS:
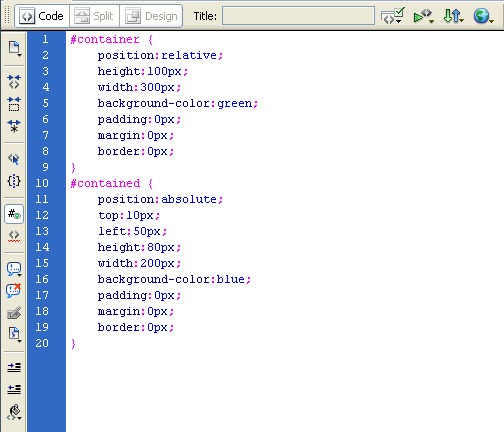
Below are the same two DIVs one after the other as in above type. The first one is still position: static position. Its position defaults to after this paragraph
The second DIV is relative position.
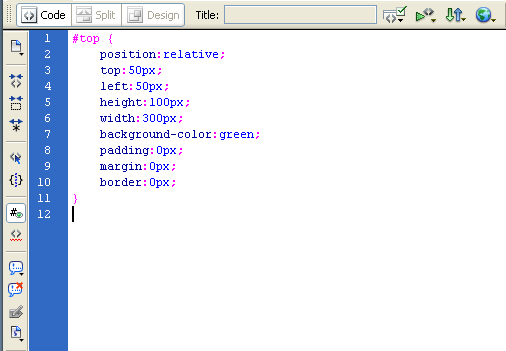
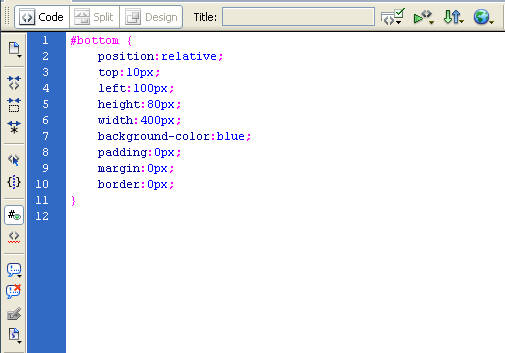
Below is the code in a stylesheet (embedded or external):
The major changes are the first few lines. This seems easy so far but changes the first element to a relative position as well and it all starts to get complex:
3) Absolute positioning in CSS:
In several ways this is easier than relative positioning. Absolute positioning places the element in position based on the position of its parent. This will not work if the parent is position: static position (so set it to relative or absolute).
Below is the code in a stylesheet (embedded or external):
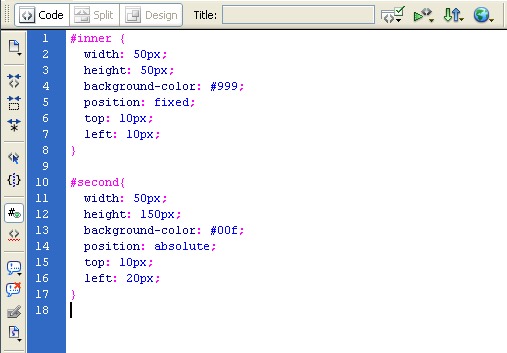
4) Fixed positioning in CSS:
Placing things in a fixed position on the page might sound perfect but it can cause problems. How do you let for all the different resolutions and browsers?
It is quite easy though. It’s just the same as absolute positioning but it ignores which element is inside which. Fixed positioned elements are positioned on the particular page rather than in another element.
HTML5 Tutorial: Base Element Tag
The HTML <base> tag is used to specify a base URI, or URL, for relative links. For example, you can set the base URL once at the top of your page, then all subsequent relative links will use that URL as a starting point.
The <base> tag must be between the document’s <head> tags. Also, there must be no more than one base element per document.
Example
Modify the code below, then click “Update”. See below for attributes.
Source Code
<head><base href=”http://www.searchenginegenie.com/javascript/” target=”_blank” />
</head>
<body>
<p>Learn about <a href=”javascript_arrays.cfm”>JavaScript Arrays</a></p><p>Note: The link above will actually resolve to <i>http://www.searchenginegenie.com/javascript/javascript_arrays.cfm</i> regardless of the URL of the current page. This is because the base URL (http://www.searchenginegenie.com/javascript/) is prepended to the (relative) URL indicated in the link (javascript_arrays.cfm)</p>
</body> Result Learn about JavaScript ArraysNote: The link above will actually resolve to http://www.searchenginegenie.com/javascript/javascript_arrays.cfm regardless of the URL of the current page. This is because the base URL (http://www.searchenginegenie.com/javascript/) is prepended to the (relative) URL indicated in the link (javascript_arrays.cfm)
Solution for HTML5 Accessibility in IE
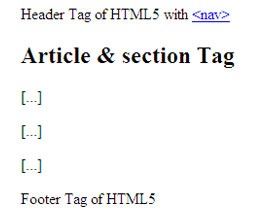
OUTPUT (in IE) AFTER FIXING THE SOLUTION:
OUTPUT (in IE) BEFORE FIXING THE SOLUTION:
HTML5 CODE:
<!DOCTYPE html>
<html xmlns="http://www.w3.org/1999/HTML" lang="en" xml:lang="en">
<head>
<meta charset="utf-8" />
<title>My first HTML5 website</title>
</head>
<body style="padding-left: 35px;">
<header> Header Tag of HTML5 with
<nav><a href="#"><nav></a> </nav>
</header>
<article>
<section>
<h2>Article & section Tag</h2>
<p>[…]</p>
<p>[…]</p>
<p>[…]</p>
</section>
</article>
<footer>Footer Tag of HTML5 </footer>
</body>
</html>
CSS CODE:
header {
background: #9e9e9e;
width: 600px;
height: 25px;
color:#FFF;
font-size:20px;
display: block;
text-align:center;
}
header a {
color: #FFF;
}
header a:hover {
color: #ebebeb;
}
article{
color: #CCC;
font-family:Arial, Helvetica, sans-serif;
font-size:14px;
}
footer {
background: #9e9e9e;
width: 600px;
height: 25px;
color:#FFF;
font-size:20px;
display: block;
text-align:center;
}
The main script should be added to the
section. It only can access the HTML5 in IE. Without the below script you will not get the required output.That’s it…
LED Concept in HTML5
(Note: This HTML5 Canvas concept will not work in Internet Explorer)
Step-1 Open a new HTML document.
Step-2 Paste the below code and save it as led.html.
<!DOCTYPE html>
<html><head>
<title>The mesmerizer</title>
<meta http-equiv="Content-Type" content="text/html; charset=UTF-8">
<script src="https://www.searchenginegenie.com/web-design/ga.js" async="" type="text/javascript"></script><script type="text/javascript" src="https://www.searchenginegenie.com/web-design/jquery-1.js"></script>
<script type="text/javascript" src="https://www.searchenginegenie.com/web-design/main-canvas.js"></script>
<script type="text/javascript">
var _gaq = _gaq || [];
_gaq.push([‘_setAccount’, ‘UA-1365544-2’]);
_gaq.push([‘_trackPageview’]);
(function() {
var ga = document.createElement(‘script’); ga.type = ‘text/javascript’; ga.async = true;
var s = document.getElementsByTagName(‘script’)[0]; s.parentNode.insertBefore(ga, s);
})();
</script>
</head>
<body class="mesmerizer" style=" background-color:#FFF; margin:0px; padding:0px;">
<canvas id="pixelCanvas" width="500" height="500" style=" top:-150px;"></canvas><br>
</body></html>
Step-3 Download the below js file and attach it to the html document.
jqeury-1.js
ga.js
main-canvas.js


