Creating a Stylish Button , 27 August, 2008

1.Create a new text layer.
Create a new file in Photoshop with image size as 200 x 200.Choose foreground color as #b61ebf. Select the Rounded Rectangle Tool.Draw a rectangle with this tool. A new layer Shape 1 will be created.

2.Create another layer.
Click on the layer Shape1 and press 'Ctrl + J' . A new layer Shape 1 Copy will be created. Click on the layer thumbnail of this new layer and change the color to #d176d7.


3. Applying the borders for the button.

Select the layer Shape 1 Copy .Choose the transform tool by clicking on 'Ctrl + T'. Using 'Shift + Alt' keys, reduce the size of this layer border .


4. Draw the design for the layer.
Select the layer Shape 1 Copy. Choose the 'Direct Selection Tool'.Delete the bottom right most 2 anchor points .To do this, select each anchor point and right click and choose 'delete anchor point'.The path of 'Direct Selection Tool' will change to a triangle.Move the bottom left most anchor points slightly to the top.
In the middle of the path,right click and choose 'Add Anchor Point'. Drag one of the anchor points to form the curve.

This the output.

5. Applying the gradient for the layer
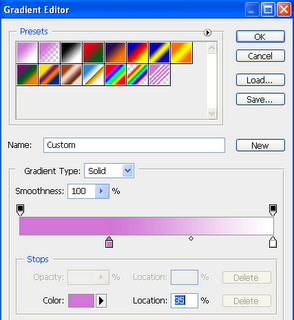
Choose the layer Shape 1 Copy. Select the option "Add a layer style". Choose the option 'Gradient Overlay'. Double click on "Gradient" option. Choose the upper left most colour "Foreground to Background". Change the color of the extreme left color stop by clicking on the color stop. Click the color option and choose the following color #d176d7.Drag the extreme color stop a bit to the right.



6. Add a custom shape to the layer.
Select the custom shape tool.Pick any shape you require.In our case we have selected this arrow shape. A new layer Shape2 will be created. Disable the effects of this layer once the shape is drawn.This is done to get a very clear shape.


7. Add the text to the layer.
Select the Horizontal Type Tool. Select Myriad pro,Bold,18 point ,ffffff, Strong.A new layer
Layer 1 will be created. Type the text Download.

8. Add Bevel and Emboss
In case you need to add Bevel and Emboss effect ,select the Shape 1 Layer.Select the 'Add a Layer Style' button.Select Bevel and Emboss Option.Reduce the opacity to 15%.

Labels:


posted by Treesa @ 12:30 AM permanent link   |

Post a Comment

|    
   
Create a Steel Effect for text , 22 August, 2008
     

1. Create a new text layer.
Create a new file in Photoshop with image size as 150 x 50.
Select the Horizontal Type Tool ,choose font values Myriad Pro, Bold, 48,Strong, 7731ec.A new layer 'Style' will be created.


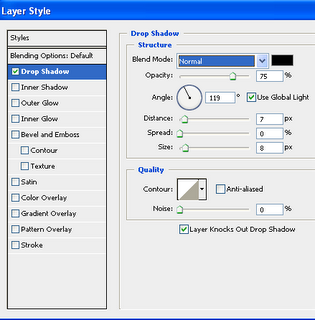
2. Apply the 'Drop Shadow' effect
Select the layer 'Style'. Double Click on this layer. Choose the style
'Drop Shadow'. Apply the following values to get the output as shown.


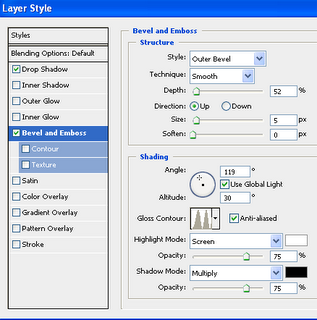
3. Apply the 'Bevel and Emboss' effect
Choose the Style 'Bevel and Emboss'.Apply the following values
for Structure and Shading to get the output as shown. Ensure that the 'Gloss Contour'
and 'Anti-Aliased' options are selected in Shading .


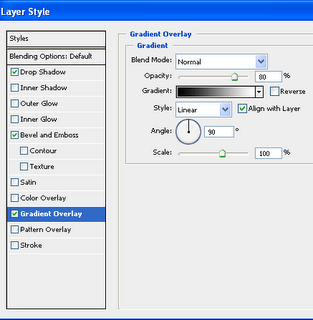
4. Apply the 'Gradient' Effect
Choose the Style 'Gradient Overlay'.Apply the following values
to get the output as shown.


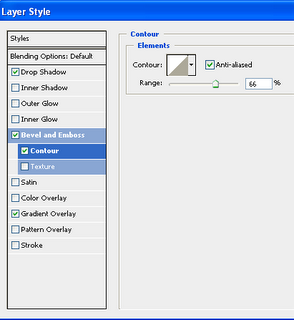
5. Apply the 'Contour' to 'Bevel and Emboss'
Select the following values to get the output as shown.


6. Change Colour of Text
Now since the text is still Vector Text with styles applied to it,we can change the
colour of text.Select Horizontal Type Tool and select the top swatch and select
white color. We get a perfect steel effect.


Labels:


posted by Treesa @ 4:36 AM permanent link   |

Post a Comment

|    
   
Creating background using Shadow Effect , 19 August, 2008
     

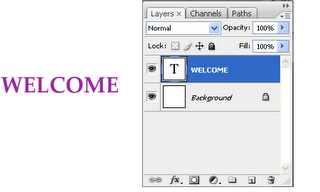
1. Create a new text layer.
Create a new file in Photoshop with image size as 200 x 200.Choose foreground
colour as '993399'. Select the horizontal type tool ,choose font values palatino type,
bold,40 pt and sharp.A new layer 'Welcome' will be created.


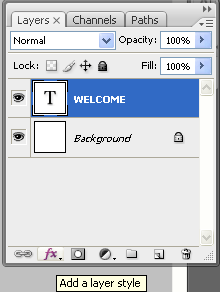
2. Select the layer style .
Select the layer 'Welcome'.Click on 'Layer Style'. Choose the option 'Drop Shadow'.


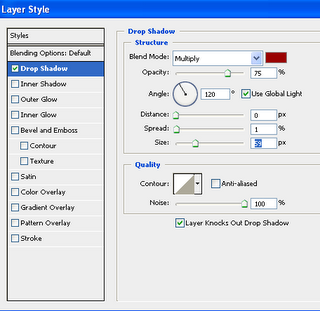
3. Apply values for 'Drop Shadow' Layer Style
Change the following values : Color value : 990000,Opacity=75%, Spread=1%,
Size=59px, Noise=100%


The background changes as follows.


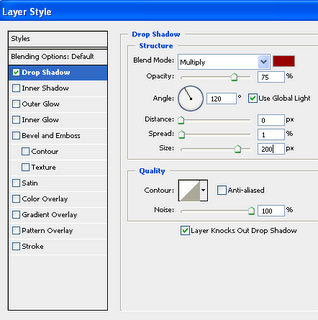
4. The final output.
Change the value for size as 200 px.


Labels:


posted by Treesa @ 12:37 AM permanent link   |

Post a Comment

|    
   
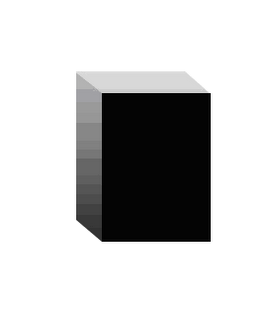
3D Effect , 14 August, 2008
     

1. Create a new rectangle box
Create a new file in Photoshop. Let the foreground and the background layer be the default values of black and white. Select the rectangle tool and draw a rectangle in black color.The layer name will be 'Shape 1'
2. Make a duplicate copy of the rectangle.
Select the move tool. The rectangle gets selected.
Select 'Alt' and Mouse click, and when the mouse pointer changes, drag the duplicate copy of the rectangle. The layer name will be 'Shape 1 copy'

3. Change the color of the duplicate copy.
Select the layer 'Shape 1 copy'. Click on the thumbnail icon of the layer
and select the color 'CCCCCC'. The color of the layer changes.
4. Combining the edges of both the images.
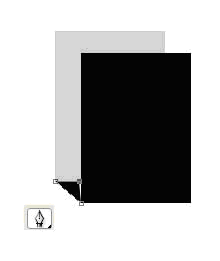
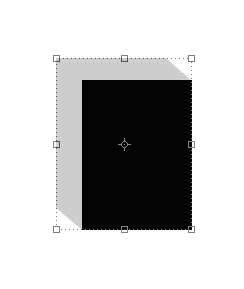
Using the pen tool, join the 3 points as shown in the picture. A new layer 'Shape 2'
will be created.

Repeat the same procedure for joining the edges in the top also. A new year layer 'Shape 3' will be created.

5. Apply the Gradient Effect
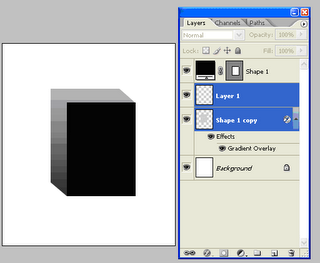
Select the layers 'Shape 2', 'Shape 3' and 'Shape 1 copy' by clicking the "Shift" key. Right click and select option 'Merge Layers'.


Click on the thumbnail of the merged Layers 'Shape 1 Copy'. The screen Layer Style will appear. Double click on Gradient Overlay. Click on gradient option. From the Gradient Editor, choose the color of the gradient by moving the Color Stop. The gradient change will be applied in the Layer.


6. Apply the brightness to the picture

Note : Since the gradient effect is already applied to the layers, in order to add brightness to the 3d picture, we need to add a new layer.
Add a new layer 'Layer 1'. Merge the layers 'Layer 1' and 'Shape 1 Copy.


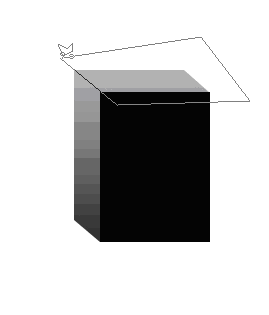
Using the Lasso Tool , select the top portion


Select Image->Adjustments-Brightness/Contrast. Give the Brightness value as 40.
We get the final picture.

Labels:


posted by power @ 5:52 AM permanent link   |

Post a Comment

|